Building a cleanroom requires strict adherence to ISO 14644 standards to ensure compliance, reduce contamination risks, and avoid costly delays. Here's what you need to know:
Bottom Line: Owners must ensure designs meet regulatory and operational needs from the start, verify compliance during construction, and maintain rigorous monitoring post-commissioning to protect their investment.
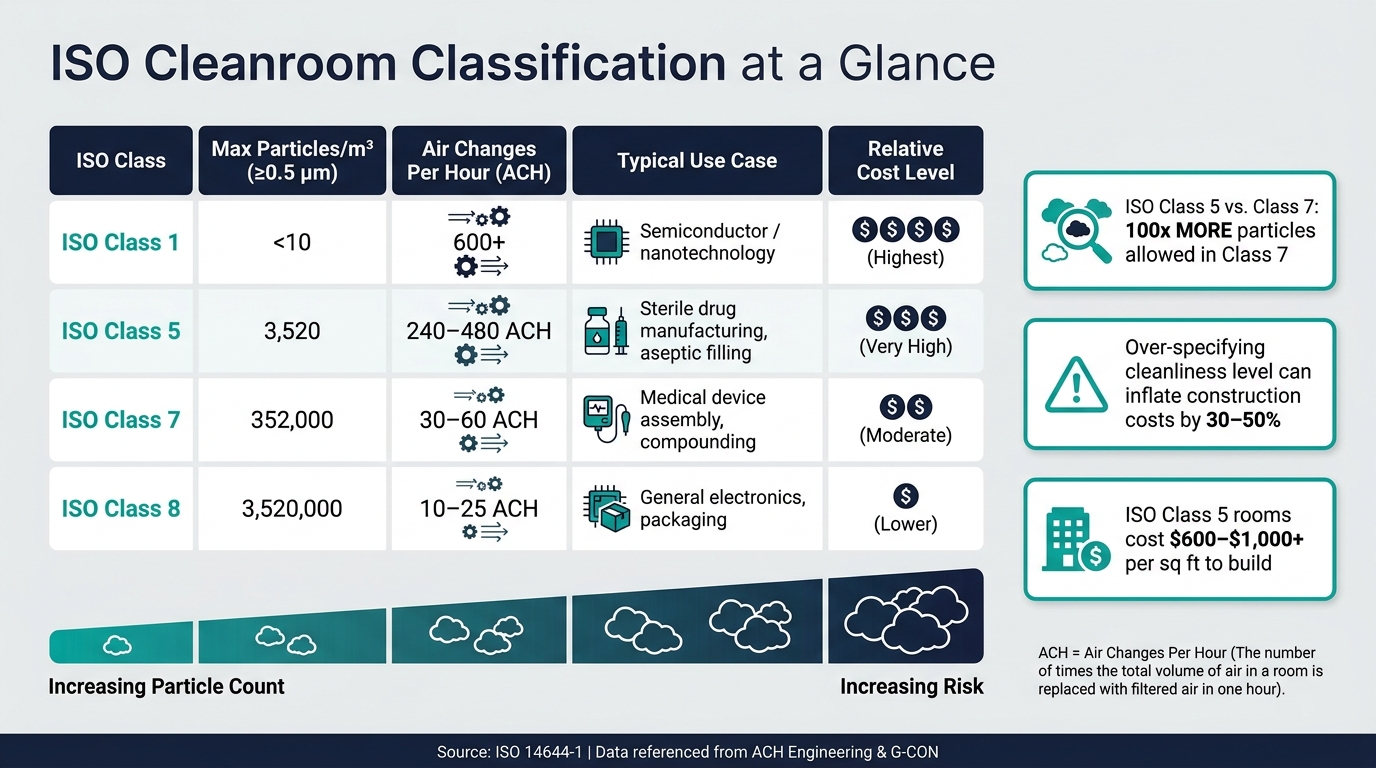
ISO Cleanroom Classes Compared: Particle Limits, Airflow & Cost Impact
ISO 14644's Parts 1, 2, and 4 are essential for anyone managing a cleanroom project. Here's a breakdown of what you need to know about each part.
Part 1 lays out the classification system that forms the foundation of cleanroom standards. Cleanrooms are ranked from ISO Class 1 (the most stringent) to ISO Class 9 (the least stringent), based on the number of airborne particles per cubic meter. A key focus for regulated industries is the count of particles ≥0.5 µm.
The differences between classes are striking. For example, an ISO Class 5 cleanroom allows no more than 3,520 particles/m³ (≥0.5 µm), while ISO Class 7 permits up to 352,000 particles/m³ - a 100-fold difference. This gap significantly impacts costs and energy usage. ISO Class 5 environments typically require 240–480 air changes per hour (ACH), whereas ISO Class 7 only needs 30–60 ACH [6][7].
"Selecting the right ISO class is not about choosing the 'cleanest' environment possible - it's about aligning cleanliness levels with product risk, process sensitivity, and regulatory mandates." - G-CON [6]
Compliance must be verified in two states: at rest (equipment running, no personnel) and in operation (active production with staff). Testing both states is critical. Over-specifying cleanliness - like opting for ISO 5 when ISO 7 suffices - can unnecessarily inflate costs. A formal User Requirements Specification (URS) is essential to align the cleanliness classification with product risks and regulatory needs.
Once the air cleanliness classification is in place, the focus shifts to maintaining compliance through ongoing monitoring.
Certification isn't a one-and-done process. Part 2 outlines how to demonstrate that your cleanroom continues to meet standards over time. This involves creating a structured monitoring program with defined sampling locations, frequencies, and clear alert and action levels for parameters like particle counts, differential pressure, temperature, and humidity.
Requalification is mandatory: every 6 months for ISO Class 5 or cleaner, and every 12 months for ISO Classes 6 through 9 [6]. Ignoring this can have serious consequences. For example, in June 2024, the FDA issued a warning to Optikem International, a Denver-based manufacturer, after inspectors found that environmental monitoring was done sporadically instead of with each production batch. From February 2021 to March 2023, fungi and bacteria were repeatedly detected in ISO Class 5 critical areas, but the company failed to address the root causes. This led to the facility being deemed unsuitable for sterile drug production [8].
Automated Environmental Monitoring Systems (EMS) are a practical solution. These systems provide timestamped records and audit trails that are invaluable during inspections - something manual logs often fail to achieve consistently. Particle counters used in monitoring must comply with ISO 21501-4 to meet Part 2 standards [8].
While Part 1 defines the goals and Part 2 ensures ongoing compliance, Part 4 focuses on how to design and construct a cleanroom. The 2022 update introduced performance metrics like Air Change Effectiveness (ACE) and Contaminant Removal Effectiveness (CRE) instead of fixed air change rates. This gives designers more flexibility but also requires thorough documentation to justify design choices [2].
"ISO 14644-4:2022 shifts to performance-based ventilation metrics rather than prescriptive air change rates - giving designers more flexibility but demanding more rigorous justification." - ACH Engineering [2]
Part 4 addresses the entire construction process, from layout and flow patterns to prevent cross-contamination, to zoning between clean and adjacent areas, and standards for surface materials (smooth, non-shedding, impervious, and resistant to disinfectants). For those managing the construction project delivery process, Part 4 includes a four-stage clean build protocol. This protocol incrementally tightens cleanliness controls during construction and includes key verification steps like envelope integrity tests, HEPA filter leak tests, and formal Installation Qualification (IQ) and Operational Qualification (OQ) at start-up. These steps create the necessary evidence trail for compliance. Owners must carefully review these guidelines to ensure their cleanroom design meets both performance and regulatory requirements.
The pre-construction phase is where critical decisions are made to ensure compliance, streamline operations, and keep project costs in check. For project owners managing the complexities of construction project delivery, this stage is all about laying a solid foundation for success.
Start by finalizing the correct ISO classification through a User Requirements Specification (URS). This document outlines essential details like equipment needs, environmental conditions (temperature, humidity, vibration), and utility requirements [9].
Choosing the right ISO classification is crucial. Over-specifying - such as opting for ISO Class 5 when ISO Class 7 suffices - can inflate construction costs by 30% to 50% [3].
"Getting the classification right at the planning stage - not over-specifying or under-specifying - is where projects win or lose on budget." - ACH Engineering [9]
Another key factor is defining the occupancy state - whether the cleanroom will be as-built, at-rest, or operational. Each state has unique particle count requirements that influence design [5]. Once the classification and occupancy state are set, review the design to ensure it consistently meets these standards.
After confirming the classification, examine the design to ensure it aligns with ISO 14644 standards. This includes reviewing airflow strategies, filtration systems, pressure differentials, and surface materials.
A Design Qualification (DQ) review ensures that drawings, calculations, and specifications align with the URS and ISO standards. This step is vital, as design flaws - like poor airflow or pressure cascade issues - were cited in 22% of FDA Warning Letters between 2018 and 2025 [2].
Finally, evaluate whether the design facilitates easy maintenance to maintain long-term performance.
A well-thought-out design must allow for efficient maintenance without disrupting the cleanroom environment. Confirm the inclusion of service chases or walkable ceilings outside the controlled area. These features let technicians access filters, sensors, and utilities without compromising the cleanroom [2].
"A cleanroom that cannot be easily tested is a liability." - Anthony Horsfield, Senior Project Manager, ISO Cleanroom [1]
Key components like HEPA filters, monitoring probes, and pressure sensors should be positioned for easy access during routine testing and validation [1]. Ensure airlocks and buffer zones are adequately sized to accommodate personnel and equipment while maintaining the pressure cascade. Additionally, verify that the building structure can support rooftop HVAC equipment - often adding 50–100 lbs per square foot - and that ceiling heights of 12–14 feet are available for ductwork and plenum space [9].
Once the design and pre-construction checks are confirmed, the construction phase becomes all about maintaining quality and controlling contamination. Any misstep on-site - whether it's a poorly timed decision or lack of oversight - can jeopardize the cleanroom's integrity before it's even operational. Staying hands-on during this phase helps identify and fix issues early, which is far more cost-effective than addressing them after commissioning.
The cleanroom envelope acts as the first line of defense. Every pipe, conduit, or duct that penetrates walls or ceilings presents a risk for air leaks. Even minor gaps can disrupt the pressure differentials you've worked so hard to design. To prevent this, all utility penetrations must be sealed before finishing materials are installed. Inspection checkpoints should be set after framing and before final testing to ensure proper sealing. Pressure differential tests at this stage confirm the envelope is performing as intended before applying final finishes [2][4].
Architectural commissioning at this point should cover panel integrity, door alignment, closure force, and leakage performance [11]. Additionally, all hardware and fixtures should be flush-mounted to avoid particle buildup and hard-to-clean areas [12]. Once the envelope passes inspection, attention shifts to HVAC and filtration systems, which must meet equally rigorous standards.
During Installation Qualification (IQ), ensure that air handling units (AHUs) are properly leveled and vibration-isolated according to the design specifications. Verify that HEPA/ULPA filters are the correct models and that ductwork joints are tightly sealed and insulated [5]. A commonly overlooked step is inspecting the interiors of ducts for debris, sealant residue, or insulation fibers before starting the system [5].
When conducting filter integrity tests, the aerosol photometer probe should be positioned 1 to 1.5 inches (2.5–3.8 cm) from the filter face and moved no faster than 2 inches per second (5 cm/s). This ensures thorough testing of the filter media, sealing strips, and frame-to-ceiling joints [5]. HEPA H14 filters, for example, fail if penetration at any point exceeds 0.01% [5].
As construction progresses, cleanliness protocols must become stricter [2]. All major "dirty work" like framing, drilling, and rough utility installations must be completed before finishing materials are introduced. The envelope should be fully sealed before HEPA or ULPA filters are brought on-site, as filters contaminated during installation will fail immediately.
"Once the envelope is sealed, we implement Contamination Control Protocols. This includes mandatory gowning for all trades, the use of non-shedding tools, and localized HEPA extraction for any minor adjustments." - Anthony Horsfield, Senior Project Manager, ISO Cleanroom [1]
The table below outlines the four-phase clean build sequence, designed to address contamination risks identified during the design phase:
| Construction Phase | Cleanliness Requirement | Key Activities |
|---|---|---|
| Phase 1: Dirty Work | Standard construction | Framing, rough utilities, drilling, heavy masonry [2] |
| Phase 2: Pre-Clean | Controlled access | Sealing the envelope, installing wall panels and ceilings [2][4] |
| Phase 3: Clean Build | Mandatory gowning | Installing HEPA filters, final electrical/gas connections, non-shedding tools only [2][1] |
| Phase 4: Commissioning | Full protocol | HVAC balancing, particle counting, smoke studies, final certification [2][5] |
Modular construction methods offer a practical way to reduce on-site particulate generation by 30–40% compared to traditional stick-built techniques. By minimizing on-site cutting and drywall dust, these methods help reduce contamination risks and certification delays [2]. For projects on tight timelines, avoiding such delays is crucial, as a single misstep in material selection or airflow setup can set commissioning back by 3 to 6 months [4]. A structured approach to cleanliness during construction ensures a smoother path to commissioning and final certification.
Once the facility’s envelope is sealed and systems are installed, the commissioning phase ensures everything operates as intended before full operations commence. This stage acts as the final checkpoint, helping owners verify readiness and avoid approving a facility that might not meet operational demands.
Commissioning ensures systems are working as designed, while qualification provides documented evidence that the facility meets regulatory and ISO 14644 standards [13][14].
The qualification process is broken into three stages, each serving a specific purpose:
Each qualification stage is supported by a traceability matrix that ties every URS requirement to a specific test, ensuring all design objectives are met [10][14].
"Quality cannot be tested into a product. This means that quality needs to be designed into the product, the facility and all processes associated with the manufacturing." - FDA, as cited by Cleanroom Technology [14]
Once qualifications are complete, attention shifts to evaluating critical performance tests to confirm system reliability.
During commissioning, six essential tests should be reviewed:
"A system may meet design specs on paper, but smoke studies can reveal turbulence, dead zones, or unexpected flow patterns that impact performance." - Gagan Kaur, Rees Scientific [13]
After completing these tests, the focus turns to ensuring all findings are properly documented for final acceptance.
Before signing off on the facility, owners should carefully review the final qualification summary report. This document consolidates all IQ, OQ, and PQ results, including any deviations and the corrective actions taken [14][10]. Each result must trace back to the original URS, and any deviations should be fully resolved and re-tested. Unaddressed issues can lead to regulatory problems that might have been avoided with a thorough review.
Additionally, owners need to confirm that the monitoring system is configured to provide real-time alerts for any excursions in differential pressure, temperature, or humidity [3][10]. Even if a cleanroom passes commissioning, it isn’t truly ready for regulated operations without a functioning alarm system. For more insights on how workforce planning ties into facility readiness, check out the iRecruit Jobs & Workforce guide, which offers guidance on staffing for critical environments.
Once a cleanroom is commissioned, the work doesn’t stop there. Long-term monitoring is essential to preserve the standards achieved during construction. Even a cleanroom that meets all requirements on day one can fall out of compliance within months if monitoring and requalification aren’t part of its regular operations. For industries like life sciences and advanced manufacturing, where regulations are strict, this ongoing effort is just as important as the initial build.
ISO 14644-2 outlines the need for a formal monitoring plan to manage data effectively. This plan must specify sampling locations, testing frequencies, and establish alert and action limits for every critical parameter [12][5].
Here’s the difference between the two limits:
Key parameters that require continuous or periodic tracking include:
"Cleanroom HVAC system validation is not a single-point inspection but rather a structured, systematic procedure." - CKY Refrigeration & Air Conditioning Engineering [5]
Integrating IoT sensor networks with fixed sensors can improve the accuracy of monitoring [16]. To maintain reliability, all sensors - whether fixed or portable - should be calibrated at least once a year by an ISO/IEC 17025-accredited laboratory to ensure they meet national metrology standards [5].
These monitoring practices set the stage for effective requalification and maintenance schedules.
ISO 14644-2 specifies minimum intervals for periodic requalification testing. Here’s a quick summary:
| Test Parameter | ISO Class 5 & Above | ISO Class 6–9 |
|---|---|---|
| Particle Count Testing | Every 6 months | Every 12 months |
| Airflow Velocity/Volume | Every 12 months | Every 12 months |
| Pressure Differential | Every 12 months | Every 12 months |
| HEPA Filter Integrity | Annually (or risk-based) | Annually (or risk-based) |
Note: These intervals can be shortened if continuous monitoring shows consistent compliance [10][5].
Certain trigger events also require immediate requalification, regardless of the schedule. Examples include:
A solid change control system ensures these events are documented and accompanied by a risk assessment.
For maintenance, monitoring HEPA filter pressure drop is critical. Filters typically need replacement when the pressure drop doubles from the initial clean value, which generally falls between 400 and 600 Pascals [5].
Technical testing alone isn’t enough - active involvement from the owner is key. Human activity remains the largest source of contamination in cleanroom environments, as people shed thousands of skin particles every minute [12]. Maintaining compliance involves:
Analyzing trends in monitoring data is another critical step. For example, a gradual increase in particle counts over six months could signal a drift that’s easier and less expensive to address early than after a contamination event or failed inspection. Between 2018 and 2025, about 22% of FDA Warning Letters cited cleanroom design or construction flaws as root causes for contamination failures [2].
Routine audits also play a big role. Using a structured checklist to evaluate seal integrity, HVAC performance, and personnel behavior provides a clear, documented snapshot of the cleanroom’s condition between requalification cycles [12].
Creating a compliant cleanroom isn't a one-and-done task - it’s an ongoing commitment. In fact, around 22% of recent FDA Warning Letters highlight cleanroom design or construction flaws as the main reason for contamination failures [2].
While ISO 14644 lays out the standards, the responsibility for enforcement rests squarely on the owner. This means ensuring the correct classification is chosen before construction begins, enforcing clean build protocols during the build, and completing the full qualification process before accepting the facility. A solid understanding of construction project delivery can help owners clearly define and manage these responsibilities. These measures not only confirm the cleanroom's performance but also protect the financial and operational investment.
"Contamination failures in cleanrooms don't just compromise product quality - they trigger regulatory enforcement actions, costly recalls, and production shutdowns." - ACH Engineering [2]
Cost is another crucial factor. Building an ISO Class 5 cleanroom can range from $600 to over $1,000 per square foot, with annual operating costs falling between $150 and $250 per square foot [3]. Getting the classification right from the outset safeguards this significant financial investment.
When selecting an ISO cleanroom class, it's important to strike the right balance between compliance and practicality to avoid unnecessary expenses. Start by determining the minimum classification required for your specific application. For instance, higher classifications like ISO 5 demand more sophisticated systems, which significantly increase costs.
Evaluate the contamination risks associated with your processes and choose the lowest class that still ensures safety and meets regulatory standards. Also, factor in additional costs such as energy consumption and construction complexity. By carefully assessing these elements, you can meet your operational needs without overspending.
Before finalizing the acceptance of a cleanroom, make sure to obtain a detailed validation report. This report should include all necessary documentation showing that the cleanroom has been tested and certified in line with ISO 14644 standards and any other relevant regulations. Pay close attention to whether the report confirms critical factors such as particle control, airflow system performance, and measures for contamination prevention to ensure the cleanroom meets all required standards.
Requalification becomes essential once the cleanroom is up and running, as it involves periodic testing and validation to ensure everything remains up to standard. This process is generally scheduled every 6 to 12 months after the cleanroom is handed over. Additionally, any major changes - like adjustments to airflow systems, contamination control measures, or particle monitoring setups - can trigger the need for requalification to ensure compliance and consistent performance.