If I wait until the last walkthrough to manage punch items, I put the RFS date at risk. On data center jobs, one open item in switchgear, UPS, cooling, controls, or fire alarm can stop testing and push turnover by days or weeks.
Here’s the short version:
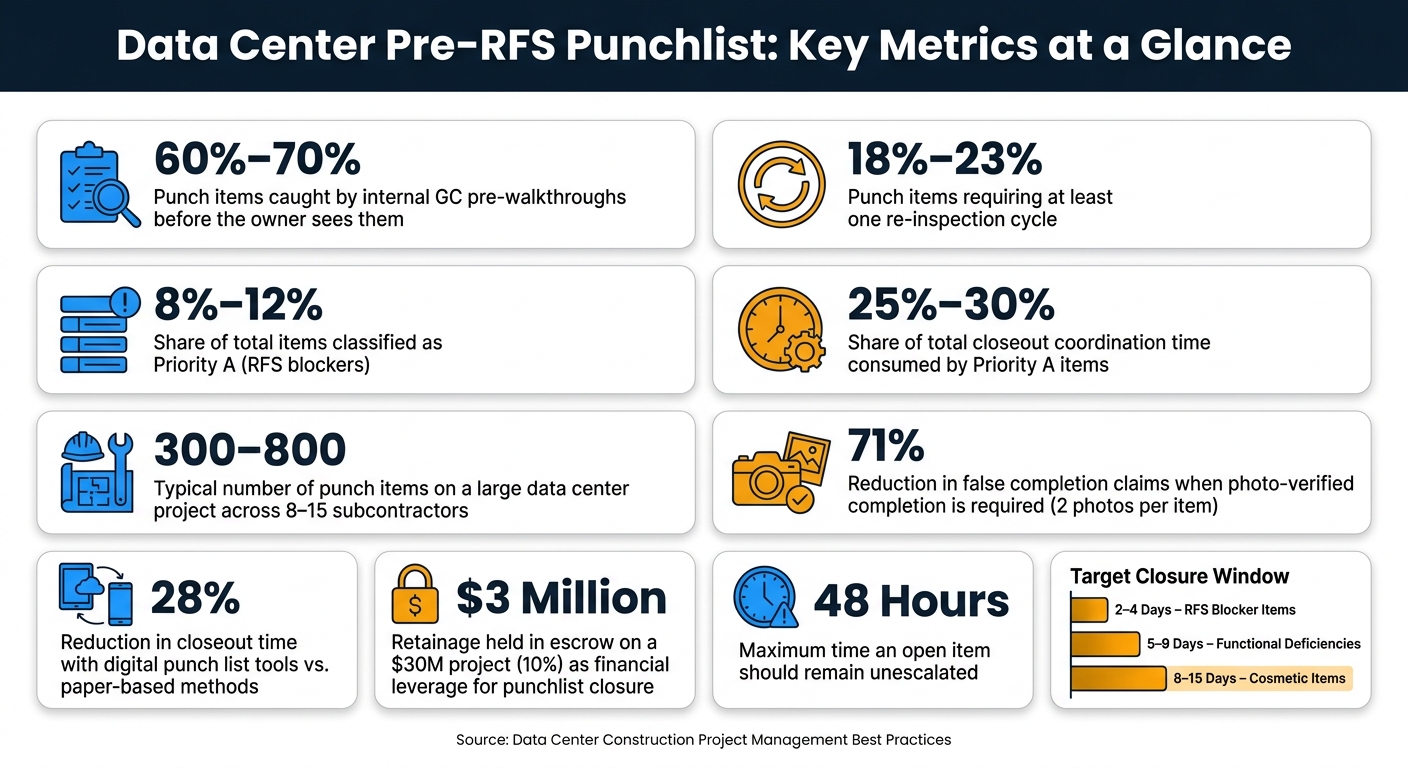
A few numbers stand out. Internal pre-walks can find 60%–70% of punch items before the owner sees them. 18%–23% of items need re-inspection. And while Priority A issues are often just 8%–12% of the list, they can consume 25%–30% of closeout coordination time.
If I want to protect RFS, I don’t run the punchlist like a cleanup list. I run it like a daily control log for testing, energization, documents, and owner handoff.
That’s the core idea behind this article.
Data Center Punchlist by the Numbers: Key Pre-RFS Metrics

Build the plan backward from the target RFS date. That gives you room for cure times, re-inspections, commissioning gates, and document deadlines. In data centers, the punchlist should sit inside commissioning, not the last walkthrough [2]. That schedule then sets the pace for every item type and closeout gate that comes after it.
Before the first punch walk, the team needs one shared definition for each item type. If that doesn’t happen, severity calls turn into opinion, and the log stops being useful. Use one contract-based definition of complete, tied to the contract, OPR, and BOD, so the team isn’t arguing about standards during Integrated Systems Testing (IST).
Use this three-tier definition matrix:
| Category | Definition | Impact on RFS | Example |
|---|---|---|---|
| RFS Blocker | Safety, code, or critical MEP failure | Stops RFS | Generator fails to start; fire alarm fault |
| Deficiency | Functional issue or BOD non-conformance | Risk to Acceptance | Pump vibration exceeds spec; missing O&M manual |
| Routine Item | Cosmetic or minor touch-up | No impact on RFS | Paint scuff in corridor; ceiling tile smudge |
Set closure targets by severity:
A flat list turns into a mess fast. Sort the log by system, space, and trade instead. Use CSI division codes, like Division 26 for electrical, so each subcontractor sees only the items tied to its work.
For location tagging, link every item to a room number or grid coordinate from the architectural drawings. A strong item entry should follow this format: location + condition + required correction + acceptance criteria. For example: "Room 220, north wall paint shows lap marks; recoat per Section 09 90 00; no visible lines under 50 foot-candles" [7]. That kind of detail cuts down the back-and-forth and helps teams close items faster.
Internal pre-walkthroughs by the general contractor usually catch 60% to 70% of punch items before the client or owner sees them [5].
Start with the confirmed RFS date and work backward. Move from self-inspections to GC quality walks, then formal owner/architect/engineer walks, and then into commissioning gates: prefunctional checks, functional performance tests, load-bank tests, IST, and AHJ sign-off. Leave room for retesting, because 18% to 23% of punch items need at least one re-inspection cycle [9].
If RFS is 09/15/2026, aim for IST completion by 09/01/2026, owner walks by 08/18/2026, and subcontractor self-punch by 08/04/2026. Track as-builts, O&M manuals, warranties, and training records alongside the construction work instead of shoving them to the end [2]. Use that same baseline in the look-ahead schedule so every trade is working from the same closeout sequence.
Once the walk sequence is fixed, the next move is to give each item one clear closure owner.
Once the walk sequence is fixed, the punchlist can swell to 300 to 800 items across 8 to 15 subcontractors, so mitigating schedule risks through priority control isn't optional [9]. At that point, the punchlist stops being a static defect list and starts working like a daily control log.
Use A/B/C labels to sort the log by RFS risk. Keep it simple:
Each label should tie back to the RFS date it protects.
On most projects, Priority A items make up only 8% to 12% of total items, yet they eat up 25% to 30% of closeout coordination time [9]. That's the point. If you sort by trade or room first, you can miss what actually threatens turnover. Sort by mission-critical impact first, then work from there.
Vague entries slow everything down. Each item needs enough detail that the assigned person can act on it without making a follow-up call. Carry the same system, room, and trade structure from the walk plan into the log so the process stays continuous from the initial walk through daily tracking.
The core fields are:
Assigning items to a named person instead of "MEP" or "the electrical sub" is one of the highest-leverage habits in a pre-RFS closeout. It removes the usual finger-pointing and puts clear ownership on the table.
Photo-verified completion rules cut false completion claims by 71% [9]. A good rule is to require two photos per item: one close-up of the deficiency and one that shows the location in context, like the room number or column line [9].
Digital punch lists can cut closeout time by 28% compared with paper-based methods [5].
| Tool | Best Use Case | Strength | Limitation |
|---|---|---|---|
| Procore | Large-scale project management | Mobile-first field capture; subcontractor self-service | Higher cost; needs full team adoption [5][9] |
| Autodesk Build | Model-based issue tagging and field-to-office workflows | Strong integration with BIM and project sheets | Heavy setup and training required [9] |
| Bluebeam | Drawing markups and PDF-based reporting | Industry-standard PDF markups and studio sessions | Hard to scale past 50 items [6] |
| Excel | Small or single-trade scopes | $0 cost; easy for everyone to access | No automated notifications or photo integration [8][9] |
Pick the tool the field team will actually use. The best platform on paper means nothing if supers and subs avoid it.
Run the log on a fixed weekly cadence: Monday for new defects, Wednesday for midweek fix checks, and Friday for a formal trade-by-trade review with the owner [8][9]. Move each item through a short status path - Open, In Progress, Ready for Review, and Closed - so nothing gets stuck in limbo [6][9]. Any item open for more than 48 hours should be escalated [9]. Use the same codes in commissioning and QA/QC so closeout, testing, and turnover stay aligned.
Once the punchlist has a clear structure and the team reviews it on a set rhythm, the next move is simple: connect every open item to commissioning and QA/QC. A pre-RFS punchlist should feed commissioning, not run on a separate track. If field defects, test failures, and QA/QC findings sit in different logs, the team loses the one view that shows what can still stop RFS.
Every issue found during installation verification, pre-functional checks, functional performance testing, or Integrated Systems Testing (IST) should go into the same punchlist log the field team already uses. Tag each item with the commissioning level where it was found - for example, Level 1 FAT or Level 4 Functional Testing - so the team can spot which open deficiencies put the next test window at risk right away [1][4].
Use a "Commissioning Blockers" label for any field defect that prevents a test from running. That gives the construction team and the commissioning agent one shared signal before a test window starts to slip. Keep the item open until retest evidence is attached and the status is updated.
QC forms, deficiency logs, and the punchlist should all use the same room, equipment, system, and status codes [1][4]. The log fields that matter most are:
Use the same status labels across every log - Passed, Passed w/ Exception, Failed & Retested, Deferred to IST, or Owner Accepted - so review meetings stay consistent [3].
Once field verification lines up, closeout discipline moves to records, training, and owner handoff.
Physical completion does not equal RFS readiness. Missing O&M manuals, as-builts, or test reports can still block owner acceptance [2][4].
Build a required-document register by trade and system during procurement instead of waiting until substantial completion [2]. That register should track O&M manuals, warranties, serial numbers, spare parts lists, sequences of operation, alarm matrices, BMS/DCIM point validation records, training records, SOPs/MOPs/EOPs, lien waivers, final change orders, and retainage release.
Confirm these six evidence streams before calling a system ready for RFS [2].
| Evidence Stream | Components |
|---|---|
| Construction | Punch items, as-built drawings, permit sign-offs |
| Equipment | O&M manuals, warranties, serial numbers, spare parts list |
| Commissioning | FAT/SAT records, IST reports, load-bank test results |
| Controls | Sequences of operation, alarm matrices, BMS/DCIM point validation |
| Operational | Training records, SOPs/MOPs/EOPs, escalation matrix |
| Commercial | Lien waivers, final change orders, retainage release |
Treat owner training like a test requirement. The operations team should witness tests, practice procedures, and formally approve maintainability before the system is declared ready [4]. Tying the training record to the equipment tag keeps the closeout package searchable at turnover.
When the log, tests, and documents all line up, the last risk comes down to ownership and follow-through.
Once commissioning and documentation line up, the next risk is simple: who owns what.
After you set commissioning and closeout criteria, assign named owners at kickoff with a RACI matrix. The Owner's Project Requirements (OPR) and Basis of Design (BOD) spell out what “pass” and “fail” mean during commissioning and turnover [3]. That matters more than it sounds. If those lines are fuzzy, teams waste time arguing instead of closing items.
Clear ownership cuts the back-and-forth and keeps work moving. And once each item has a named owner, it’s much easier to tie closeout to deadlines, leverage, and escalation.
Money usually gets attention fastest.
On a $30 million data center project, 10% retainage means $3 million can stay in escrow until the punchlist is closed [10]. That’s a strong incentive. If retainage release depends on a zero-defect trade area, plus delivery of O&M manuals, warranties, and training records, subcontractors have a clear reason to put closeout near the top of the list [7].
When items stall, use a written escalation path instead of letting delays drift:
That works even better when it’s paired with a 30-minute weekly closeout huddle and 20-minute daily area walks with the responsible foreman. Small issues get caught early, before rework starts piling up [7].
Closeout works best when every item has one owner, one due date, and one verification.
Don’t wait until the job is almost done to think about your punchlist. Start earlier with a rolling punchlist approach: document issues and assign them as work is finished, not all at once at the end.
Then, in the final phase, schedule an internal pre-punch walkthrough 2 to 3 weeks before the formal owner inspection. That gives the general contractor time to fix items, shrink the formal list, and avoid surprises at turnover.
An RFS (Ready-for-Service) blocker is any issue that stops the data center from being energized, commissioned, or handed over to operations.
In plain terms, if a problem keeps the site from running as planned, passing checks, or meeting handoff rules, it’s an RFS blocker.
Common blockers include:
Any issue that affects performance, redundancy, or compliance must be fixed before turnover.
A system is ready for turnover only after it has been proven with evidence - not just because it looks finished.
It needs to work under actual load, fail in a safe way, recover the way the team expects, and meet day-to-day operating needs. That’s the difference between something that appears done and something that’s ready to hand over.
Readiness is confirmed when all of the following are in place:
That last point matters. If something failed during testing, it’s not enough to say it was fixed. You need proof from retesting that it now works as required.